Feeds:
Posts
Comments

I’m MOVING!

I’m moving my blog to a new home!    You can find me now at  my new DM Dezigns blog.

Mark your calendar for January 1-3; that’s when Stampin’ Addicts presents their 2010 Occasions Mini Blog Hop.

This hop features 23 SA members, each showcasing a different item from SU’s 2010 Occasions mini.  Stamp sets, designer papers, Sizzix dies, punches–our ladies have fun and fresh ideas to share for all this and more!

Dedicated to all things Stampin’ Up, Stampin’ Addicts offers SU-oriented galleries, challenges and special events.  Membership is free of charge, and is open to Stampin’ Up fans everywhere.

I’ll be participating in the hop at my new home  DM Dezigns.

Sharing some Scrappin’

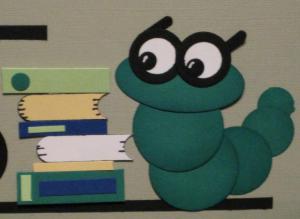
I haven’t had much time to stamp lately, but I was catching up on Latenightstampers (a yahoo group I’m part of) and saw this wonderful bookworm incorporated into a scrapbook page created by Ellen Kemper at Blinkin’, Thinkin’ & Inkin’.  She has an entire layout  around this bookworm and books.  She even shows how to make this wonderful little guy.

Here’s a picture of Ellen’s bookworm to tease you into checking out her blog.

Ellen Kemper's Bookworm

Ellen Kemper's Bookworm

Thanks for stopping by!  I’ll be at SU’s Regional in Chattanooga next weekend and will be sharing samples and swaps from there when I get back.   I’m thinking about starting a regular feature sharing some of the great inspiration I find on other’s blogs.   Let me know if you think that’s a good idea.

Dawnmarie

Blog Carnival Logo banner

I’m so excited to share some of the project I’ve made using My Digital Studio!  It’s so easy to use and the result are awesome!

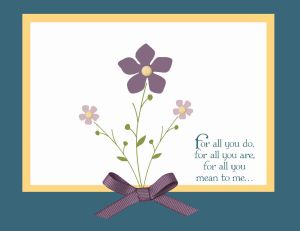
First up,  I wanted to play with card, a layout without photos.    You could do this to set up your card before creating it, saving valuable cardstock, or you could print it and use it as it is, or print it and create a hybrid project by adding embellishments to it.

For All You Do Card (MDS)

For All You Do Card (MDS)

Isn’t that awesome!  I had so much fun creating it and now I think I might have to create it the old fashioned way too.

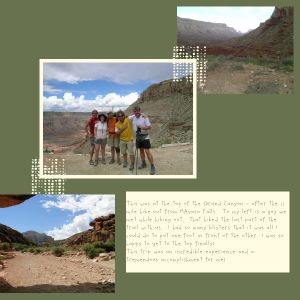
One of my favorite experiences was hiking to Havasu falls in the Grand Canyon with a group of friends.  It was 11 miles in carrying a backpack.  We camped in the canyon for a couple of days, swam in the small lake at the bottom of the falls in absolutely gorgeous blue green water.  I had so many blisters on my feet, that we rented a donkey to take my pack out, but I walked out myself.  I was so proud and so tired when we got to the top.  I’ve never scrapped any of the pics from that trip – until now.  This page shows a pic of some of us  when we got to the top of the canyon after hiking out (yes that’s 11 miles up hill).   Talk about some awesome memories.

Grand Canyon-001

I can’t wait to do the rest of the trip!

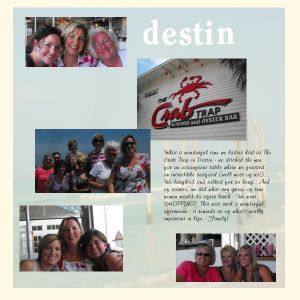
Here’s another scrapbook page that showcases a girls lunch we had on a family trip to Destin Florida.  The background is a picture of the ocean I took at Destin, and then I layered on top.

Destin 09 1-001

Here’s one more scrapbook layout – I’ve had so much fun with this.  I just can’t seem to stop myself!

Best Friends-001

I’ve posted this one before, but I have to leave you with my favorite christmas card ever – and my favorite pug. .  . . .

xmas photo-001

Hasn’t it been a blast to see some of the things you can do with MDS?   And there’s even more to see!  Check out this post for links to the other blogs that are part of the party!   And don’t forget the links are good all month, so feel free to stop by and enjoy the MDS party anytime!

or click on this logo to take you there as well!Blog Carnival Sidebar-001

Blog Carnival Logo banner

Starting at noon EST on Saturday, October 3,  Stampin’ Addicts will be hosting a Blog Party that will be done carnival style (this is new for us!).

The links will be posted here in this post instead of linking in a circle and each blog will have a sidebar button that will link back here to the master list of blogs. Each “Party Blog” will showcase different ideas on how to use My Digital Studio. You’ll see how to use MDS to plan traditional stamping projects, how to create hybrid projects (that use both traditional and digital features) and how to create completely digital projects. We have all had such a blast getting ready for this and we can’t wait to show you how incredible My Digital Studio is!

The party starts this weekend and keeps going until November 1st so you can come back as many times as you want during October. Be sure to join us as we celebrate the launch of Stampin’ Up!’s My Digital Studio

Here’s a list of all the blogs that will be participating!
DMDezigns/Dawnmarie: My Digital Studio – The Birdseye Overview
HowManyCats?!/Comeka: Digitize Your Sketch Library with MDS
Yapha: Turning Templates into Treasures
Willysgirl/Sarah: MDS Xmas and Extras
Hollylogic/Holly: MDS as a Design Tool (or How Not to Slice Up All Your Brushed Gold)
Lyssa: Playing with Stamps You Don’t Own
Lilysinkpad/Sara: Simply Scrappin’ Kits Go Digi
JulieA/Julie: Wanna Little Music with Your Slideshow?
lovetostampandscrap/Cheryl: Creating a Calendar to Beat All Calendars
Melina Stamps!/Melina: Man-Scrapping with MDS
BroncoMom/Joyce: Build Your Own DSP
Britiney: Clever Album Covers – A Piece of (Cup)Cake
S1itcher46/Kim: Hybridizing and Cataloging Collections
Kelli: Side-by-Side Test: Is it Actual or Is It MDS?
Scrapbookmama/Ellie: Keeping the Spotlight on Your (Adorable!) Subjects

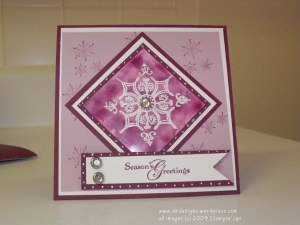
You know how sometimes, you see a card someone else has done and you just love it so much that you have to copy it almost exactly, detal for detail?   Well, that’s what happened with this lovely card.   I changed the color, but really almost nothing else from the original.  This technique is called Magic Snowflake – and the instructions for how to do it are on Julie Dinn’s Blog.  I loved this so much  that I did it for a shoebox swap.  Thanks Julie for sharing it with us!

Rich Razzleberry Magic Snowflake

Rich Razzleberry Magic Snowflake

So here’s the recipe for my version:

Stamps:  Serene Snowflakes, Snow Swirled

Ink:  Rich Razzleberry, Pale Plum, Perfect Plum, White Gel Pen

Paper:  Glossy White, Whisper White, Rich Razzleberry,  Pale Plum Textured CS

Accessories:  My Way Punch, Clear Rhinestone Brads

So, I’m having a great time playing with SU’s new digital papercrafting software!  It’s available for purchase on October 1, but in the meantime, I’m previewing it!

Here’s my first project using the new software.

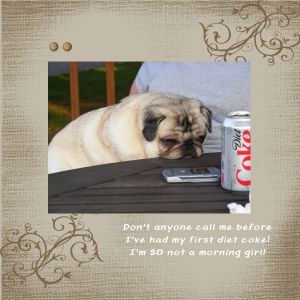
sadie morning-001

This page stars my darling princess pug Sadie – who is definitely not a morning pug!   My mom took this picture a couple of years ago.    It really shows Sadie’s normal attitude!    I thought it was a perfect picture to start with in My Digital Studio!

Okay, so I created this digitally using My Digital Studio –  starting with  a Sahara Sand background, layered with  the Textured background stamp in Soft Suede.  Added the flourishes from Baroque  Motifs in Soft Suede, used a couple of digital Soft Suede Brads, and my text in Whisper White.  I think the layout is quite elegant and would work with a number of different colors and pictures!

Here’s one more!  As you can tell, my little princess is a favorite subject of mine!  Even though she doesn’t like to pose for pictures.  Here’s an idea for a photo christmas card.

xmas photo-001

This uses Garden green as the background.  The snowflakes are from Season of Cheer and are in Whisper White.  The bow is in real red.  I love how My Digital Studio allows me to use images from our stamp collection as well as  embellishments we would use everyday like ribbons or buttons.

Can you tell I’m having fun with this?

Sorry for the lack of posts this week!  I’ve been working to get ready for my Holiday Ideas Event which will be on September 12 at 2 pm! There will be lots of ideas for the upcoming holidays and of course, plenty of fun and prizes!

College football has just started – and it’s Saturday, so I’m headed out to a game –  Fall in the South, what can I say?   I’m hoping to post the tutorials from the hop and a couple of other projects on Monday!

So don’t give up on me yet!  Check back Monday for more stuff!

holiday mini blog hop

Welcome to Stampin’ Addicts Happy Holidays blog hop. The Happy Holidays blog Hop will feature sneak peaks of the different stamp sets and accessories the Holiday Mini Catalog has to offer. There are 40 jam packed pages of the Holiday Mini Catalog that will fit any of your holidays needs!

If you have been following the blog hop in order you’ve just seen Ashley”s wonderful creation’s at Stamp with Ashley featuring Just Beclause and the incredible Christmas Cocoa Designer Series Paper.

I’m featuring the set Berry Christmas.  This is such a great little set of 8 stamps that includes a weath,  a snowflake, a poinsettia, a bird, holly berries and leaves,  the Make Merry sentiment and a hanger for the wreath.

I had so much fun playing with this set.  I knew I could do something Christmasy with it, but I wanted to challenge myself to do something non-Christmas.   Here’s what I came up with – a cute little box of  thank you cards!  This is a standard A2 box that will easily hold 6 cards – in this case 3 of each design.  I kept these really simple, but you could easily dress them up with some ribbon or brads.
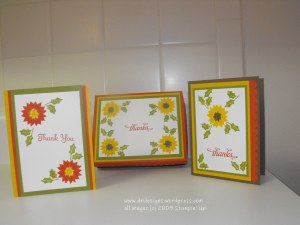
Thank You Card Set

Thank You Card Set

Here’s the recipe for this one:

Stamps:  Berry Christmas, Thank You Kindly

Paper:  Soft Suede  and Dusty Durango Textured cardstock,  Crushed Curry, Old Olive, Soft Suede and Whisper White cardstock

Ink:  Old Olive, Crushed Curry, Soft Suede, and Dusty Durango Classic Ink

Accessories:  Scallop Edge Punch

Next up is a cute little gift bag because we cannot head into the holidays without lots of gift bag ideas, right?   This bag is from a tutorial created by Julie Ebersole.  I’ll link to her tutorial after the hop is over, so check back next week for instructions!
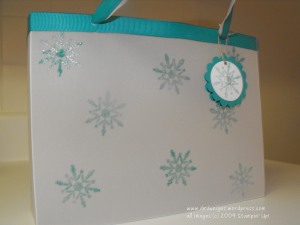
Vellum Gift Bag

Vellum Gift Bag

Isn’t this bag so fun!  It’s made with our Vellum cardstock and I hope you can see a little bit of the shimmer on the snowflakes.  Yes!  SU has shimmer paint!  It’s really so easy to use and takes so little paint to acheive the effect.  I inked my stamp with Bermuda Bay ink then applied a small amount of shimmer paint to the inked stamp using a sponge dauber.  Then I stamped the image onto the Vellum and Voila!  A Shimmery Snowflake!.    I did the same thing on Whisper White and punched it out for the gift tag.  I  sponged Bermuda Bay Shimmer Paint onto one of our 5/16″ Jumbo Brads to give a little more pizazz to the gift tag.  I’ll post more pictures and details for this project with the instructions next week.

Here’s a quick rundown of the recipe for this one:

Stamps:  Berry Christmas

Paper:  Bermuda Bay, Whisper White and Vellum cardstock

Ink:  Bermuda Bay Classic Ink, Champagne Shimmer Paint

Accessories:  Bermuda Bay Polka Dot Ribbon, 5/8″ Satin ribbon Whisper White, Linen Thread,  5/16″ Jumbo Brads, 1 3/8″ Circle Punch, Scallop Circle Punch

I know, you’re starting to wonder where the Christmas cards are right? After all, this is a holiday blog tour and I am using a Christmas set . . . .  well, wait no more, next up  . . .  Christmas Cards!
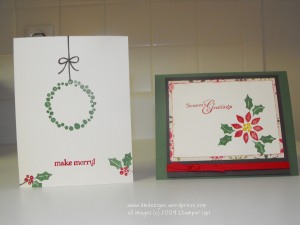
Berry Christmas Christmas Cards

Berry Christmas Christmas Cards

I kept all my projects simple this time as I think sometimes some of us – myself especially, tend to create overly complicated plans for our holiday season.  I thought it would be nice to imagine a simpler Christmas season this year.  We’ll see if I can actually pull it off.   I’ll be playing with the card on the left again – next week come back to see it dressed up and converted from a single layer card to a multi layer card.  Gretchen B did this on her blog a few weeks ago and I’ve been dying to try it , so next week I will with this card.

Single Layer Card Recipe (Left Card)

Stamps:  Berry Christmas

Ink:  Garden Green, Real Red, Chocolate Chip Classic Ink

Paper:  Very Vanilla cardstock.

Poinsettia Card Recipe:

Stamps:  Berry Christmas,  Snow Swirled

Paper:  Garden Green, Chocolate Chip and Very Vanilla cardstock, Christmas Cocoa DSP

Ink:  Garden Green, Real Red, Crushed Curry

Accessories:  1/4″ Real Red Grosgrain Ribbon

My last card was my husband’s favorite of these.  You can’t tell from the picture, but this paper is flocked.  The white portion is raised and soft.  It’s so very cool to work with.
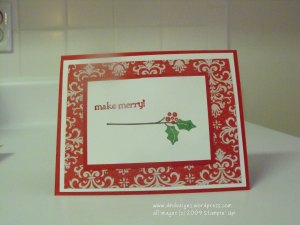
Make Merry Christmas Card

Make Merry Christmas Card

Make Merry Recipe:

Stamps:  Berry Christmas

Paper:  Real Red and Whisper White cardstock, Christmas Cocoa DSP

Ink:  Chocolate Chip, Garden Green and Real Red Classic Ink.

I hope you enjoyed my sneak peek at the new Berry Christmas stamp set! I know it makes so in the mood for the holidays!  I’m ready to light the fire and sip some cocoa!

The hop is over but you can still check out the projects by clicking on any of the links below.

1 Tracy: Sweet Centers (Tracy’s Stamp Therapy)
2. Michelle: Grateful Greetings (Come Stamp with Me)
3. Sarah: Pumpkin Patch (Sarah’s Ink Spot)
4. Twila: Twick or Tweet (Stamp a Little Longer)
5. Sara: Haunting Hill & DSP (Lily’s Ink Pad)
6. Marie: Night & Day DSP (From Combat Boots…)
7. Holly: Autumn Splendor & Tablesetting Die (InkPaperStamps)
8. Joyce: Autumn Meadows DSP (Stampin’ Central)
9. Lyssa: Calendar Kit with Magnetic Box (Song of My Heart Stampers)
10. Trina: Gifts of the Earth (Stamps and Whiskers)
11. Kim: Wandering Words (Stitchin’ N Stampin’ on Paper)
12. Carmen: Cold & Cuddly (Stamping Addiction)
13. Ashley: Just Beclause & Christmas Cocoa DSP (Stamp with Ashley)

14. Dawnmarie: Berry Christmas (DM Dezigns)
15. Rhonda: Holy Family (The Stampin’ Bunny)
16. Kat: Delightful Decorations and Punch (Kat’s Kards)
17. Cheryl: Icicle and Merry & Bright Rub-Ons (Love to Stamp and Scrap)
18. Holly/catrules: Serene Snowflakes (Holly’s Stampin’ Mania)
19. Paula/scrapshappen: Décor Elements & wood blocks (Stamping with Paula)
20. Linda: Charming (Olive Stamps)
21. Barbara/cre8tivestamper: Simply Adorned (Creative Stampin’ Spot)
22. Yapha: Bear Bigz Die and clothes (Yapha Stamps)

holiday mini blog hop

Sorry I’ve been a little MIA this week!  I’ve been busy getting ready for this weekend’s blog hop!   I’m so excited to be featuring the set Berry Christmas that’s appearing in the new Holiday Mini that will be live September 1.  Don’t think it’s all Christmas around here this weekend though – I’ve come up with a project using this set that is not Christmas!  I know you’ll like it.

A blog hop is a “loop” of blogs that are connected for a special occasion – like kicking off a new mini catalog! – by easy to find links.   This weekend’s hop starts Saturday at noon EST and continues through Monday.   With all the amazing new products in this mini catalog you can be certain there will be lots of cool stuff to see.  Be sure to stop by for a party full of amazing projects!


Last week, I shared a sample from convention and my first attempt at recreating it.  I’ve finally gotten to play some more, so today I have more to share and a new technique!

We’ll start with the finished card I made for my Aunt’s 60th birthday.   I decided not to add ribbon or a sentiment to the outside because it seemed complete the way it was.

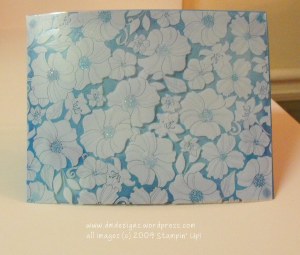
Brayered Window Sheet Birthday card

Brayered Window Sheet Birthday card

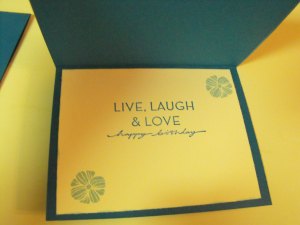
I did add a sentiment to the inside.

Inside of card.

Inside of card.

This is an easy technique and I think it really gives a nice WOW factor to the card.

To create the background:

1.  Add 2 drops of reinker about an inch apart from each other on a piece of wax paper.   Then stagger 2 more drops of a different color about a 1/2 inch below the first two.

2.  Spritz the reinker/wax paper with rubbing alcohol.  Roll the Brayer in the inch and apply to glossy card stock.

3.  Sprtiz the brayed card stock with rubbing alcohol.  And place the paper, glossy side down on the inked portion of the wax paper.   Brayer the back of the cardstock.

4.  Allow to dry.

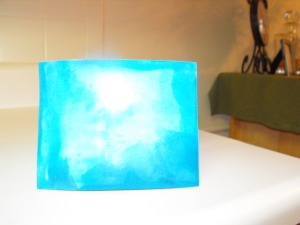
You’ll end up with something similar to this.  A heavier spritz on the brayered side at step 3 will give more interest and variability to the finished sheet.  I used the retired Baha Breeze and Pacific Point reinkers for this one.

Brayered background

Brayered background

5.  Using a dry aqua painter (that’s right, no water in it), touch the brush to your craft ink pad (for this one I used Tempting Turquoise, on the tree below, I used Whisper White).  Apply the craft ink to the window sheet to add accent (for the flowers, I just did the center.  For the tree, I  was creating snow on the leaves and branches) .

6.  Add Iridescent Ice Embossing Powder and set with heat tool.  When you are using the heat tool, keep the tool moving.  Don’t hover over 1 place or you’ll burn the window sheet.

7.  Attach the window sheet to your background using glue dots and finish your card.

I tried this with Dazzling Diamonds glitter earlier in the week.  The main difference is the glitter is flat on the surface and the embossing powder is puffy and raised.  So especially on the tree, it adds dimension and feels more like snow.

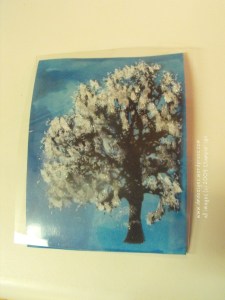
Here’s a picture of the tree done with the embossing powder.

Embossed Tree Window Sheet

Embossed Tree Window Sheet

I really love how this makes such wonderful snow!  And it doesn’t come off the card like glitter does!    I hope you enjoyed seeing how to do this!  I’d love to see what someone else comes up with !

Dawnmarie